Tuesday, July 2, 2013

Suncatchers!


For my first kids arts and crafts project, I HAD to go with these suncatchers! Since I started nannying I have done these nearly every month with a theme that goes with the month (February was hearts, March was shamrocks, etc). The best part about this craft is you can do it in any shape you want and it looks awesome! Plus the kids love doing this project.

I saw this idea originally on Pinterest from a great blog called No Time For Flash Cards. I knew I had to do it as soon as I saw it.

Here's what you'll need:

Supplies
Contact paper
Construction paper
Scissors
Streamers or tissue paper

I went with a Fourth of July theme so we used red, white, and blue party streamers. You could also use tissue paper, but this worked just as well and I got them in two packs at the dollar store. Whoo hoo! I have also used the plastic stuff that goes in Easter baskets. Actually you can use pretty much anything that you can sort of see through.

The first step is to cut out the design you want to use. I used regular construction paper and cut out the largest star I could. Then you'll want to cut out a smaller version of the same design from the inside leaving a thin outline of your design. No Time For Flash Cards used a bigger "frame", if you will, but I liked having more of the middle open for sticking. Just a personal preference.


Next you'll want to cut off enough contact paper that the whole open area is covered. Peel the paper off the back and stick the open design onto the contact paper. Then cut around the outside to remove the excess contact paper. 

Then you'll want to get the streamers ripped up in to little pieces. I tried to get the kids to do this the first time, but they weren't so into it. However, if you're kids like to rip stuff up, let them rip away! You don't need a whole lot, which is why I love the streamers because you could do this activity over and over and never run out! Put the ripped up pieces into a bowl or on a plate.  


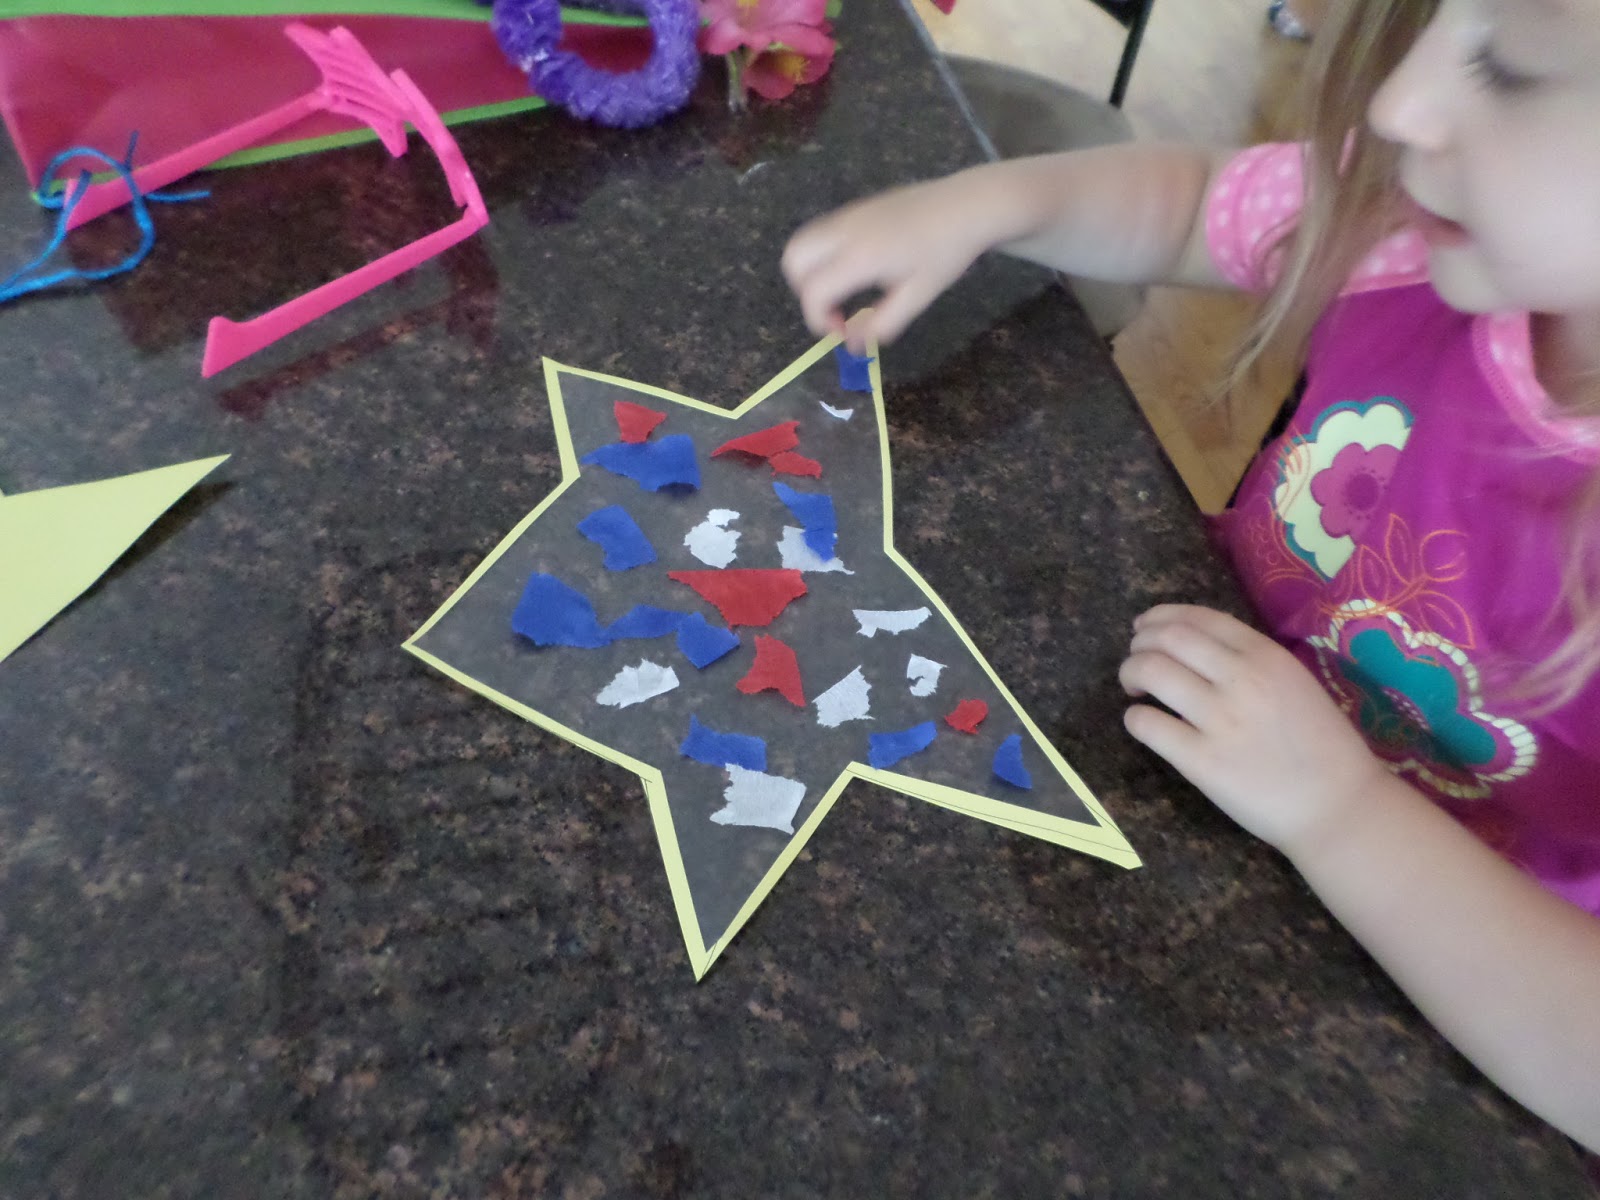
 Now comes the fun part. Put the star (or whatever design you have chosen) down with the sticky side up and have the kids put the ripped up pieces onto the contact paper.

 And one of the best parts is that once it's all done, you can just stick it onto a window! Well, that is as long as there is still space where the contact paper is not used. I've left them up for nearly two months and they peal right off when you want to put up a new one without any problem or residue (that I could see). Doesn't it look pretty?? And when the sun shines through the window it looks very cool.


And here are a couple we did previously in case you are looking for inspiration for shapes. The butterfly one used the Easter grass I mentioned previously.


Monday, July 1, 2013

Green Onion Slaw


So I don't know about you, but I am usually not a slaw fan. The only kind of coleslaw I ever liked before was the one made by my grandmother. To me it always tastes too mayonnaise-y or thick and just unenjoyable! You can imagine, then, that I was a bit hesitant when the Smitten Kitchen recipe recommended it to add to the Southwestern Pulled Brisket Tacos I made in a previous post. Clearly I trust Smitten Kitchen because I forged ahead despite my reservations!! 

Here's what you'll need:

The original recipe called for red cabbage, which I'm sure would have looked pretty, but we had regular cabbage in the house so I used that because I was lazy. In addition I only used half a head of cabbage because that's what we had and, yet again, I was lazy. Seems to be a reoccurring theme...anywho half a head was more than enough for my purposes since it was just being put on tacos as opposed to used as an actual side. Plus it seemed to expand exponentially in size as I cut it! I decided not to half the rest of the recipe because I like things to be saucy usually. It worked for me!

The recipe itself was pretty easy. First you need to thinly slice the cabbage then set it aside. The initial recipe said to shred it, but again I was lazy. Then thinly slice the red onion and add to the cabbage. Next combine the remaining ingredients except the cilantro in a food processor and mix the heck out of it! Keep going until it's smooth. Combine it all together and add the cilantro. Voila! Slaw! And I have to say I quite liked this version! It tasted awesome on the tacos! 

Smitten Kitchen did have a good recommendation about the slaw though. They recommended to not combine the cabbage/red onions with the dressing until right before you were using it. It's easy enough to make it two containers while the brisket is cooking so I followed their advice.

Enjoy! 

Green Onion Slaw
Source: Adapted from Bobby Flay via Smitten Kitchen


1/2 head cabbage, thinly sliced
1 small red onion, halved and thinly sliced

1 cup green onions, coarsely chopped
1/4 cup red wine vinegar
2 serrano chiles
2 tbsp mayonnaise
1/2 cup olive oil

Salt and pepper, to taste
1/4 cup chopped cilantro 
  

1.  Combine cabbage and red onions in a bowl and set aside.
2. Blend green onions, vinegar, chiles, mayo, salt, pepper and olive oil in a food processor until well blended. 
3. When prepared to serve, add dressing mixture to the cabbage and red onions. 
4. Fold in cilantro.
5. Add salt and pepper to taste.
6. Put on top of a Southwestern Pulled Brisket Taco.

Sunday, June 30, 2013

Southwestern Pulled Brisket Tacos


Oh sweet brisket. How I love thee...

I was slightly hesitant to make this since it was relatively close to St. Patrick's Day and I was afraid people would be so packed to the gills with corned beef that the prospect of brisket would not be received well. That fear dissipated as soon as this puppy started cooking.

I had found this recipe ages ago via Smitten Kitchen (a website that I LOVE for recipes BTW), but since I was living alone up until recently it seemed silly to cook a whole brisket just for me. If I could go back in time, I would have totally made it. It was that good.

There are only 2 downfalls of this. The first is that brisket can be freaking expensive! Damn I had no idea. And second I wanted to eat it before it was done because it smelled so good!

Now the brisket doesn't need to be made into tacos. The initial recipe suggested it could also be made into sandwiches or whatever. I just personally really liked the idea of it in a taco and it tastes awesome. I'm also not usually a fan of slaw, but it was also quite yummy as part of the taco. Everyone agreed. It is, however, quite messy. You have been warned!  Anyway, on with the recipes!

Here's what you'll need for the brisket.


First things first, a warning about this initial first couple steps. This stuff is going to smoke like whoa so make sure fans are on and/or windows are open. Second I left the fat on the brisket because it was super easy to take off later.

So first you brown the meat and then cook the garlic and onions with the spices (cumin, coriander, and chili powder). Then into the crockpot it all goes!!


Then all the rest of it goes into the crockpot. The initial recipe called for using a can of whole tomatoes and crushing the tomatoes between your fingers. I just kind of dumped them in because, well, I was lazy.


Add the cover and set that puppy to low and sit back and relax for 8-10 hours! I went for 10 and it was perfect. I mean PERFECT! It pulled apart soooo easily it was amazing!


I took the meat out, shredded it, took the bay leaves out of the pot, and then dumped the shredded meat right back into the crockpot. When, not if, I do this again I will probably use an immersion blender and mix up all the goodness that's in the crockpot a little. It was a smidge chunky which didn't work as well when serving it.

Once you are ready to serve, add some of that lovely, tasty meat to some warmed soft taco shells, top with some slaw and dig in!


Southwestern Pulled Brisket
Source: Adapted from The Food Network via Smitten Kitchen


3 lbs beef brisket
Kosher salt
Freshly ground black pepper
2 tbsp vegetable oil
5 cloves garlic, peeled and smashed
1 Spanish onion, halved and thinly sliced
1 tbsp chili powder
2 tsp ground coriander
2 tsp ground cumin
1/4 cup apple cider vinegar
1 1/2 cups water
1 (14 1/2-ounce) can whole peeled tomatoes, with their juices
1 chipotle chiles en adobo (they come in a can), chopped
2 bay leaves
1/4 cup molasses

1. Season the beef generously with salt and pepper, to taste.
2. Heat a large, heavy skillet over medium-high heat.
3. Add the oil and heat just it starts to smoke.
4. Add the meat to the skillet and cook around 10 minutes until browned on both sides by turning once (5 minutes per side).
5. Move the meat to the slow cooker.
6. Add garlic, onion, chili powder, coriander, and cumin to the drippings in the skillet.
7.  Return skillet to heat and stir for about one minute until fragrant.
8. Add vinegar and boil until most of the vinegar is gone while scraping the bottom of the pan with a wooden spoon. Beware of vinegar fumes in the steam!!
9. Add the water and stir to combine.
10. Pour mixture into the crockpot over the brisket.
11. Add tomatoes (with the juices), chipotles, bay leaves, and molasses to the crockpot.
12. Cover crockpot, set to LOW, and cook brisket for 8 to 10 hours until brisket pulls apart easily.
13. Remove brisket from crockpot and remove the layer of fat.
14. Remove bay leaves from crockpot.
15. Using immersion blender, thin the mixture in the crockpot to your desired thickness.
16. Shred the brisket using two forks and return the meat to the liquid mixture in the crockpot.
17. Make tacos using soft shell tacos with the meat.

Wednesday, March 6, 2013

Guacamole Salsa


I only have to hear the word "guacamole" and my mouth starts to water. I think I've professed my love for avocados previously, so I immediately gravitated towards this recipe off Pinterest. When I got to the recipe on Frosted Bake Shop, however, I was thrown. Because when I took a look at the ingredients....

THERE IS ONLY ONE AVOCADO?!? Say whaaaat? Yes my picture has 3 because I was too shocked to believe there was only one avocado. I still only put on in just for continuity, but if I did it again I would add more of the avocado. This recipe should have been called Green Salsa. I've also never used tomatillos before so I was skeptical, but I decided to forge ahead.

First things first, I needed to get those tomatillos de-husked. I assumed the husk was more like an onion, but those puppies stuck to the tomatillos like it was their job! Which I guess they are....I digress...The junk came off easier when I rubbed them under water.

Once that step is done, the tomatillos get quartered and and thrown into the food processor. Then add all the other ingredients and blend the heck out of it. And that's it! I must say, this was a pretty easy recipe because there weren't a lot of steps. Plus it didn't taste half bad! We ate it with tortilla chips. It was definitely more like salsa than guac. I also used it the next day on a turkey sandwich, which was yummy! Enjoy!!


Guacamole Salsa
Source: Frosted Bake Shop


1 pound tomatillos
1 jalapeno pepper
1/3 bunch cilantro
1 thick slice of onion
1 garlic clove
1 avocado
1 tsp salt

1.  Remove the husks from the tomatillos.
2. Quarter the tomatillos.
3. Place quartered tomatillos in a food processor or blender. 
4. Add jalapeno pepper, cilantro, onion, garlic, avocado, and salt to food processor or blender. 
5. Blend until smooth.

Thursday, February 28, 2013

Tres Leches Cake

Ok ok, so I made a plan to post more, but I failed miserably with that. I have, however, been doing new recipes and doing nifty projects. Now it's just time to post them! Alright, back to the fun stuff...

I am a sucker for cake. It just makes me happy. I can't help it! When I checked out this recipe for Tres Leches Cake courtesy of The Pioneer Woman, I was a bit concerned. There was a LOT of liquid being poured onto that cake! But I decided to give it a shot....And here we go!

Here's what you'll need. Look at all that liquid!!


First you add all the dry ingredients together. Then you need to separate a whole boat load of eggs. Oh yes, this recipe is SUPER HEALTHY! That's why it tastes so good :) Check out the nifty egg separating doohickey I found in the kitchen. It made my life so much easier and was awesome! I must buy one...But I digress.
 

 Throw those yolks in the mixer with the sugar and get mixing!


 Then add the milk and vanilla and mix some more! But this time only a little bit.


 Once it is combined, add the yolk-y yummy mixture (don't eat it though. you know, salmonilla and all that jazz) to the dry ingredients. Mix just to combine. 

Now quickly clean the mixer and the bowl and get to whipping up the egg whites to some nice peaks. I always find it nuts that egg whites can turn into such fluffiness!! Thank you to Alton Brown from Good Eats for letting me know why that happens! I love that guy...But again I digress....Beat the eggs to soft peaks then add the sugar and beat some more till the peaks are stiff.


Fold the egg white mixture into the egg yolk mixture but just until combined! Then add it to the baking dish.


 Bake that baby for 35-45 minutes. Once it's done, take it out and allow it to cool. Then poke a bunch of holes in it with a fork. Like a lot of holes.I had a bit of an issue finding a plate to put this cake on so we had to cut it a bit first (quality control and all) and I put it on the best plate I could find. Ideally you want a plate that the cake can sit in and has a rim of some sort.


 Next is the odd part (at least it was for me). Combine the sweetened condensed milk, evaporated milk, and heavy cream together. I warned you this wasn't the healthiest of cakes! Once it's all together, pour all but 1 cup of the milky concoction onto the cake. Yes, you read that right. Pour the it all over the cake including the edges. I freaked out a little when I did this at first because the milk sort of sat there initially, but if you waited it all got sucked up by the cake! Craziness....


Give the cake 20-30 minutes to suck up all the goodness. Then it's frosting time! Well, whipped cream time. Add the heavy cream and the sugar to the mixing bowl and whip it up good.


 Once the frosting seems to the consistency of your liking, ice the cake and voila! You're done.


I have to say I was a bit skeptical about this cake, but it was delicious! Be forewarned that the bottom of the cake in the middle can get extra mushy if you have plate that isn't entirely flat under the whole cake, but we ate it regardless. Enjoy!!

Tres Leches Cake
Source: The Pioneer Woman

1 cup flour
1-1/2 tsp baking powder
1/4 tsp salt
5 eggs, divided
1 cup sugar, divided
1
tsp vanilla
1/3 cup milk
1 can evaporated milk
1 can sweetened, condensed milk
1/4 cup heavy cream


Frosting:

1 pint heavy cream
3 tbsp sugar


1. Preheat oven to 350 degrees. Grease or spray a 9 x 13 inch pan.
2. Combine flour, baking powder, and salt in a large bowl.
3. Separate eggs and beat egg yolks with 3/4 cup sugar on high speed until yolks are pale yellow. Stir in milk and vanilla. Pour egg yolk mixture over the flour mixture and stir very gently until just combined.
4. Beat egg whites on high speed until soft peaks form. With the mixer on, pour in remaining 1/4 cup sugar and beat until egg whites form stiff peaks. 
5. Gently fold egg white mixture into the batter until just combined. Pour into prepared pan.
6. Bake for 35 to 45 minutes or until a toothpick comes out clean. Turn cake out onto a rimmed platter and allow to cool.
7. Combine condensed milk, evaporated milk, and heavy cream in a small pitcher. When cake is cool, pierce the surface with a fork several times. Slowly drizzle all but about 1 cup of the milk mixture onto the cake.
8. Allow the cake to absorb the milk mixture for 30 minutes.
9. For frosting whip 1 pint heavy cream with 3 tablespoons of sugar until thick. Spread over the surface of the cake.