Monday, July 15, 2013

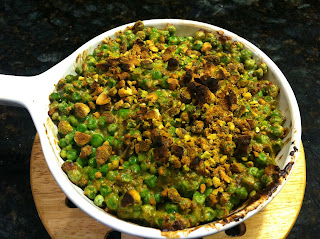
Baked Peas with Tarragon, Yogurt, and Pistachios


Pistachios are awesome. I'm just saying. They really are! I could eat them all day long if given the option. I don't care if I'm getting a years worth of sodium! Those green little nuggets of deliciousness are wonderful.


Despite my love of pistachios, I've never tried cooking with them. I figured this was as good a time as any! I saw this recipe on 101 Cookbooks via Pinterest.

So here's what you'll need.

First get your oven going. I left the peas out to thaw (read as lazy), but the initial recipe recommended putting them in a clay pot to thaw them out on the stove over low heat. Do whatever works for you!

Next add the rest of the ingredients except for 1/4 cup of pistachios into a food processor and let her go! It should become like a chunky paste.

Then mix the peas and the yogurt mixture together and put into a baking dish. Add the remaining pistachios on top of the pea loveliness and bake that puppy until the top browns a bit (around 15 minutes).


That that's it! Enjoy!


Baked Peas with Tarragon, Yogurt, and Pistachios
Source: The Breakaway Cook via 101 Cookbooks

1 pound frozen baby peas
1/2 cup loosely packed fresh tarragon leaves
2 scallions, chopped
2 tbsp olive oil
1/4 cup Greek yogurt
1/2 cup chopped pistachios
salt, to taste

1. Preheat the oven to 500F.
2. Thaw the peas and put into a baking dish.
3. Add tarragon, scallions, olive oil, yogurt, and 1/4 cup of the pistachios into a food processor.
4. Combine yogurt mixture with peas and mix gently into baking dish.
5. Top baking dish with remaining chopped pistachios.
6. Bake for 15 minutes until the top browns.

Monday, July 8, 2013

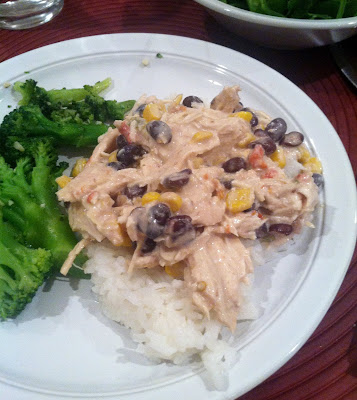
5 Ingredient Easy Chicken Crockpot Meal


I love myself an easy recipe. That's probably why I love my crockpot so much because what could be easier than throwing things into a pot, leaving it alone for hours, and coming back to deliciousness? Not a whole lot...

I saw this on Pinterest with the recipe coming from The Larson Lingo. The label on the pin was "Easiest Dinner Ever". Enough said. I was sold. Yeah for easy!! And man, was it easy.

Here's what you'll need:

The original recipe used chicken tenderloins, but I had chicken breasts in the freezer so I went with that. Now the most time consuming part was draining the corn and draining/rinsing the beans. Tough, I know!!

So in goes the chicken. The initial recipe said you could put it in frozen, but that always freaks me out so I thawed it first. Then comes the cream cheese. And then everything else! Set that puppy to low and leave it be for 6 to 8 hours.

Once all was said and done I made some rice to go along with it and pulled it apart with forks in the crockpot.

I have to say it was pretty good. A tad bland, but totally an easy, repeatable recipe. Might need to think about how to spice it up a bit, but it definitely would work in a pinch!


Easy Chicken Crockpot Meal
Adapted from The Larson Lingo 

1 1/2-2 pounds of chicken breast
8 oz package of regular cream cheese
1 15 oz. can of black beans, drained & rinsed
1 15 oz. can of corn, drained
1 can of Rotel 

1. Put chicken breasts in the crockpot.
2. Add cream cheese to crockpot.
3. Add beans, corn, and Rotel to the crockpot.
4. Set crockpot to Low and cook for 6-8 hours.
5. Shred chicken in the crockpot.
6. Serve over rice.

Sunday, July 7, 2013

Copycat Olive Garden Italian Dressing

I'm not going to lie. My favorite parts about going to Olive Garden are the unlimited salad and breadsticks. I would be content just having those for a meal! So when I saw this recipe on Pinterest for an imitation dressing, I had to give it a go.

The recipe I found came from Because Barenaked Chef Said So. I was a bit surprised by the recipe once I saw the ingredients since one of them was Italian dressing mix. To me that kind of seemed like cheating, but I was already committing to doing this so c'est la vie.

Here's what you'll need.


The next step is REALLY tough. Are you ready??

Throw it all into a blender or food processor.

Aaaaand that's it. I mean it's quite easy. In the end it wasn't really all it was cracked up to be. I mean it wasn't bad by any means, but it was just another dressing. We used it all, but I don't think I'll be going through the effort again any time soon. What do you think?

Copycat Olive Garden Italian Dressing
Source: Adapted from Because Barenaked Chef Said So


1/4 cup olive oil
1/ 2 cup vegetable oil
1/2 cup white vinegar
1/2 tsp dried Italian spices
1/2 tsp salt
Black pepper, to taste
1/2 tsp sugar
1/4 tsp garlic powder
1/2 tbsp mayonnaise
1/4 cup water
1 envelope of  Good Seasons Italian Dressing Mix


1. Combine all the ingredients together in a food processor.
2. Mix for 30 seconds
3. Serve and store extra dressing in the fridge.

Tuesday, July 2, 2013

Suncatchers!


For my first kids arts and crafts project, I HAD to go with these suncatchers! Since I started nannying I have done these nearly every month with a theme that goes with the month (February was hearts, March was shamrocks, etc). The best part about this craft is you can do it in any shape you want and it looks awesome! Plus the kids love doing this project.

I saw this idea originally on Pinterest from a great blog called No Time For Flash Cards. I knew I had to do it as soon as I saw it.

Here's what you'll need:

Supplies
Contact paper
Construction paper
Scissors
Streamers or tissue paper

I went with a Fourth of July theme so we used red, white, and blue party streamers. You could also use tissue paper, but this worked just as well and I got them in two packs at the dollar store. Whoo hoo! I have also used the plastic stuff that goes in Easter baskets. Actually you can use pretty much anything that you can sort of see through.

The first step is to cut out the design you want to use. I used regular construction paper and cut out the largest star I could. Then you'll want to cut out a smaller version of the same design from the inside leaving a thin outline of your design. No Time For Flash Cards used a bigger "frame", if you will, but I liked having more of the middle open for sticking. Just a personal preference.


Next you'll want to cut off enough contact paper that the whole open area is covered. Peel the paper off the back and stick the open design onto the contact paper. Then cut around the outside to remove the excess contact paper. 

Then you'll want to get the streamers ripped up in to little pieces. I tried to get the kids to do this the first time, but they weren't so into it. However, if you're kids like to rip stuff up, let them rip away! You don't need a whole lot, which is why I love the streamers because you could do this activity over and over and never run out! Put the ripped up pieces into a bowl or on a plate.  


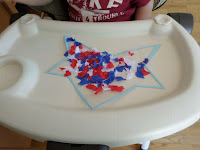
 Now comes the fun part. Put the star (or whatever design you have chosen) down with the sticky side up and have the kids put the ripped up pieces onto the contact paper.

 And one of the best parts is that once it's all done, you can just stick it onto a window! Well, that is as long as there is still space where the contact paper is not used. I've left them up for nearly two months and they peal right off when you want to put up a new one without any problem or residue (that I could see). Doesn't it look pretty?? And when the sun shines through the window it looks very cool.


And here are a couple we did previously in case you are looking for inspiration for shapes. The butterfly one used the Easter grass I mentioned previously.


Monday, July 1, 2013

Green Onion Slaw


So I don't know about you, but I am usually not a slaw fan. The only kind of coleslaw I ever liked before was the one made by my grandmother. To me it always tastes too mayonnaise-y or thick and just unenjoyable! You can imagine, then, that I was a bit hesitant when the Smitten Kitchen recipe recommended it to add to the Southwestern Pulled Brisket Tacos I made in a previous post. Clearly I trust Smitten Kitchen because I forged ahead despite my reservations!! 

Here's what you'll need:

The original recipe called for red cabbage, which I'm sure would have looked pretty, but we had regular cabbage in the house so I used that because I was lazy. In addition I only used half a head of cabbage because that's what we had and, yet again, I was lazy. Seems to be a reoccurring theme...anywho half a head was more than enough for my purposes since it was just being put on tacos as opposed to used as an actual side. Plus it seemed to expand exponentially in size as I cut it! I decided not to half the rest of the recipe because I like things to be saucy usually. It worked for me!

The recipe itself was pretty easy. First you need to thinly slice the cabbage then set it aside. The initial recipe said to shred it, but again I was lazy. Then thinly slice the red onion and add to the cabbage. Next combine the remaining ingredients except the cilantro in a food processor and mix the heck out of it! Keep going until it's smooth. Combine it all together and add the cilantro. Voila! Slaw! And I have to say I quite liked this version! It tasted awesome on the tacos! 

Smitten Kitchen did have a good recommendation about the slaw though. They recommended to not combine the cabbage/red onions with the dressing until right before you were using it. It's easy enough to make it two containers while the brisket is cooking so I followed their advice.

Enjoy! 

Green Onion Slaw
Source: Adapted from Bobby Flay via Smitten Kitchen


1/2 head cabbage, thinly sliced
1 small red onion, halved and thinly sliced

1 cup green onions, coarsely chopped
1/4 cup red wine vinegar
2 serrano chiles
2 tbsp mayonnaise
1/2 cup olive oil

Salt and pepper, to taste
1/4 cup chopped cilantro 
  

1.  Combine cabbage and red onions in a bowl and set aside.
2. Blend green onions, vinegar, chiles, mayo, salt, pepper and olive oil in a food processor until well blended. 
3. When prepared to serve, add dressing mixture to the cabbage and red onions. 
4. Fold in cilantro.
5. Add salt and pepper to taste.
6. Put on top of a Southwestern Pulled Brisket Taco.